There's 3 "simple" elements to making the fuel gauge work:
1. The gauge itself;
2. The fuel sender in the tank; and
3. The wiring between those two.
It so happened that when I started this "diagnosis", I had just finished the tand breather system (see part 2 of this article below) so the boot floor was already out. It seemed pretty logical to have a look at the fuel gauge sender at the same time.
Now normally (on any other car that I have ever tried this with), if you connect the gauge wire at the sender straight to earth, it should read "full" - but in this case, there isn't a flicker. The fault therefore seems to be in the gauge or in the wiring...
 So next, you look at the fuel gauge. Unlike the S-Series, you can reach most of the wiring behind the dash, without taking it out. The fuel gauge
is at the end, so it's the easiest!
So next, you look at the fuel gauge. Unlike the S-Series, you can reach most of the wiring behind the dash, without taking it out. The fuel gauge
is at the end, so it's the easiest!
It has two green wires to one terminal (which is live when ignition is on) and a black wire and a green/black wire to the other terminal (which both appear to be earthed). The green/black goes to the sender, while the black wire should be a "permanent earth" to the gauge casing.
 First I disconnect the gauge from the loom, noting again where the wires go - colours exactly as per the wiring diagram.
 Here's the back of the gauge, with the panel light bulb holder, and two terminals marked "Batt" and "sender" - can't be simpler eh? Still no
explanation for the black wire though - it's not connected to earth... Anyway while I'm rummaging around in the wiring behind the dash, I find
another black wire that IS earthed, with a round terminal on the end. If I hold that against the gauge, the panel light works!
Here's the back of the gauge, with the panel light bulb holder, and two terminals marked "Batt" and "sender" - can't be simpler eh? Still no
explanation for the black wire though - it's not connected to earth... Anyway while I'm rummaging around in the wiring behind the dash, I find
another black wire that IS earthed, with a round terminal on the end. If I hold that against the gauge, the panel light works!
OK, on to testing of the gauge itself. Connect a piece of wire to the "Batt" terminal, and another bit to the "sender" terminal. Hold the gauge against the battery "-" terminal, the "batt" wire to "+" terminal, and touch the "sender" wire to battery "-". Nothing, not a flicker... Now I'm pretty convinced that (a) the gauge wasn't wired in properly, and (b) the gauge isn't working (possibly as a result of (a) above?).
This is where I make a mistaken assumption - that the gauge isn't working. But where am I going to buy another 50-years old AC Delco gauge (which works on a different resistance range from other senders designed for Smiths gauges)? Luck seems to be on my side though - a wee online search turns up a brand new identical fuel gauge, still in its box, for auction on ebay, with no bids and 5 days left to go. I decide to contact the buyer and make an offer he can't refuse. Half an hour later, offer accepted and new gauge on its way! We'll call this "Gauge No 2."
Wehn it arrives, I take it out of its box, and notice a wee sticker on the side that says "24 Volts"... a bit of research shows that these gauges were fitted to a lot of military vehicles at the time, and they are all 24 volts. The Vixen isn't... I try wiring it up but - not a peep. I test it at the battery and still not a flicker.
I decide to send off the original gauge (No 1) for a refurb. He says it could take up to 4 weeks though, so in the meantime, I need cheap temporary gauge. I trawl the internet again looking for something that looks right, but that matches to the tank sender. I read that the tank sender has a resistance range of 0 to 90 ohms, so I need a gauge that works with that. Some gauges read from 90 ohms (empty) to 0 ohms (full), and others expect 0 ohms when empty and 90 ohms full. I don't know which I need.
At this stage I connect up my test meter to the sender, and find that the resistance is 65 ohms. I put more fuel in, and see that the resistance rises - so it seems I need a 0-90 gauge and not a 90-0. I order one that won't look too out of place, but at least will let me see how much petrol I have left.
 When it arrives (we'll call this gauge no 3), it works, except that it reads back to front, so when it says "empty" it means "full" and vice versa.
 A few weeks later, the refurbished fuel gauge comes back. When I wire it in, it immediately reads "full", and I know it isn't. It goes to zero if I
earth the sender wire. It seems to be out of calibration.
A few weeks later, the refurbished fuel gauge comes back. When I wire it in, it immediately reads "full", and I know it isn't. It goes to zero if I
earth the sender wire. It seems to be out of calibration.
At this point I realise, rather stupidly, that I don't know if the car has the correct sender. So the first step is to empty the tank and see what it reads. I use a vacuum pump and extract about 25 litres of fuel from the tank, until I can hear that it's empty. To confirm, I start the car and run it for a minute until it coughs to death as it runs out of fuel.
The gauge still reads "full". No bloody use...
So, I remove that gauge from the dash and replace it with my temporary gauge (which reads the wrong way). It reads "full" (or "empty" if you translate it back-to front).
I put in about a gallon of fuel. The gauge doesn't move and the car doesn't start. So there's at least a gallon in the bottom of the tank when the car runs out...
 I put in another gallon. The gauge flicks up to around 1/16th from empty. The car starts. So that confirms that "empty" means "empty"...
I put the rest of the fuel back in.
I have 4 options... I can put the right gauge in, but have no idea how much fuel I have. I can find a gauge that matches the sender but not the rest of the gauges. I can find a sender that matches the "correct" gauge (but I have no idea what I'm looking for). Or I can leave it with the wrong gauge reading back-to-front, that does at least tell me before I stutter to a halt. For the moment, I'll stick with option 4.
 Someone has helpfully written that the sender was overhauled on 3/11 - presumably March 2011 - or is it November 2003? What I also notice is that
the sender is held in with 6 screws, whereas all of the senders I have seen on Vixen forums (fora?) seem to have 5 screws. The "book" says that the
sender is apparently out of an MG midget or Morris Minor or early Mini - but as far as I can see, those have a 75mm diameter sender with 5 screws,
and mine is only 60mm… which seems to be the same size as very early Fords like to Model Y or 105E Anglia.It might not be a standard sender...
Someone has helpfully written that the sender was overhauled on 3/11 - presumably March 2011 - or is it November 2003? What I also notice is that
the sender is held in with 6 screws, whereas all of the senders I have seen on Vixen forums (fora?) seem to have 5 screws. The "book" says that the
sender is apparently out of an MG midget or Morris Minor or early Mini - but as far as I can see, those have a 75mm diameter sender with 5 screws,
and mine is only 60mm… which seems to be the same size as very early Fords like to Model Y or 105E Anglia.It might not be a standard sender...
I want to test the resistance of the sender over its full range, so I remove the gauge connector and then those 6 screws, making sure I don't drop them down the back of the tank.
 With the sender out, I measure the depth of the tank as just under 10 inches, then I put a bit of neoprene over the hole and a block of wood to hold
it down.
With the sender out, I measure the depth of the tank as just under 10 inches, then I put a bit of neoprene over the hole and a block of wood to hold
it down.
 The sender has a rubber gasket, which seems to have been sealed with a white sealer. It looks like old bathroom sealer, and it has gone crumbly in
places...
The sender has a rubber gasket, which seems to have been sealed with a white sealer. It looks like old bathroom sealer, and it has gone crumbly in
places...
 Then I check the range of movement of the sender arm. The sender isn't clamped in the vice here, it's held in place by the welding magnet. the yellow
tape is 10 inches below that level (the bottom of the tank) and the steel rule shows the line of the top of the tank. The float moves exactly over
that range - so empty means empty and full means full.
Then I check the range of movement of the sender arm. The sender isn't clamped in the vice here, it's held in place by the welding magnet. the yellow
tape is 10 inches below that level (the bottom of the tank) and the steel rule shows the line of the top of the tank. The float moves exactly over
that range - so empty means empty and full means full.
 The sender resistance at empty is 267 ohms...
 and at full, 18 ohms...
 Now, let's see how resistant this sealer is to petrol... let's clean it off the gasket and the sender - with petrol! As you can see, it dissolves
like a Scottish football defender when any half-decent opposing player is anywhere near... more evidence of the half-bodged fuckaboutery I've already
seen in other work on this car since I got it.
Now, let's see how resistant this sealer is to petrol... let's clean it off the gasket and the sender - with petrol! As you can see, it dissolves
like a Scottish football defender when any half-decent opposing player is anywhere near... more evidence of the half-bodged fuckaboutery I've already
seen in other work on this car since I got it.
 I've made a new gasket out of cork sheet. The outside diameter is around 62mm, but the cap that I had to draw around was only 60mm, so I cut slightly
outside the line. The inside diameter is 45mm, which is exactly the size of the cap off a brake fluid bottle. After the photo, I filed the outside
down a tiny bit, nearer the line. Then I cut out two tiny "tags" opposite each other, to fit tabs in the sender unit, so it would sit flat.
I've made a new gasket out of cork sheet. The outside diameter is around 62mm, but the cap that I had to draw around was only 60mm, so I cut slightly
outside the line. The inside diameter is 45mm, which is exactly the size of the cap off a brake fluid bottle. After the photo, I filed the outside
down a tiny bit, nearer the line. Then I cut out two tiny "tags" opposite each other, to fit tabs in the sender unit, so it would sit flat.
Then I fit the cork gasket and screw it back down - not too tight, but enough to make sure the cork is compressed. I decided to fit the cork gasket dry - sometimes hermetite can lubricate cork slightly so it squashes out of the joint. The sender is a right bugger to install, but I get the 6 screws in eventually, and tighten them down, then connect the sender wiring.
Then I put that half-gallon or so of fuel into the tank, until the tank is full to the top of the filler neck, i/e about 9 inches higher than the top of the tank. It doesn't leak!
So, to recap - when I bought the car, the fuel gauge didn't work at all. I tested it off the car, it was dead, so I had it refurbished.
While it was away for repair, I fitted another gauge, which works (especially for our wee tour in June), but back-to-front - it says (almost) empty when the tank is full, and full when it's empty. It's usable, but could be better!
Got the "correct" gauge back and refitted it to the car. It still doesn't work.
I tested the tank sender with a meter - it reads 267 ohms at empty, 18 ohms at full. I don't think that's a standard sender though, bccause they are supposed to be 4 inches diameter and mine is only 3 inches.
I tested the gauges by wiring them up to the battery, with an adjustable potentiometer as a pretendy "sender", so that I could measure the resistance needed across the gauge scale.
The "temporary" gauge in the car reads empty at 0 ohms, full at 230 ohms - so almost the right range, but back to front.
The "proper" gauge reads empty at 7 ohms, full at 28 ohms... so it's also back to front but is going to read "full" until the tank is nearly empty... so no good either.
Neither of those are going to work with the sender I have...
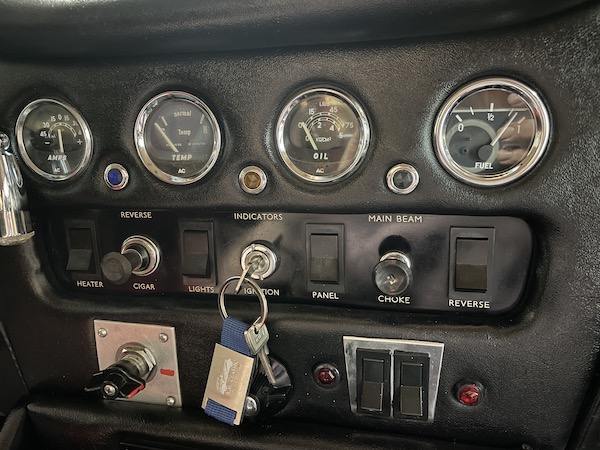 So I ordered another gauge (Gauge No 4!), as near as I could get to the "period" look - black face, retro dial, chrome bezel, that says it ranges
from 260 ohms empty to 20 ohms full. It arrived yesterday so I fitted it - easy wiring-in job!
So I ordered another gauge (Gauge No 4!), as near as I could get to the "period" look - black face, retro dial, chrome bezel, that says it ranges
from 260 ohms empty to 20 ohms full. It arrived yesterday so I fitted it - easy wiring-in job!
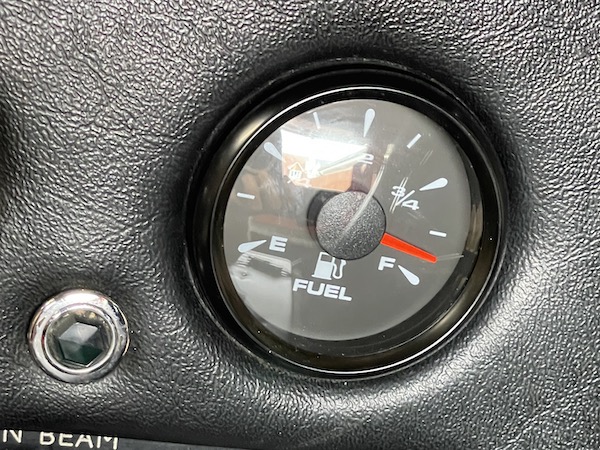
To check where "empty" is, I syphon fuel out of the tank - around 7 gallons, leaving a gallon in the bottom (the point where the car can't draw fuel out of the tank any more). The gauge reads dead on "empty", so it means it - there's no "reserve" below "empty". 4 gallons (or around 100 miles) takes it to just over 5/8ths full - so 1/2 full is around where to start thinking about filling up when "on tour"!
This has been a comedy of errors - first the assumption that you've found the problem when the gauge doesn't work, and then faffing around to identify what the sender signals, and finding a gauge to match.