:: Diary - July 2025 ::
:: Sunday, 6 July 2025 ::
I'm a barbie git
cooking barbie shit
in my garage
stinking out my carriage.
Barbies can be fun
When you get the sun
but when it's pissin'
the fun will soon go missin...
 Yesterday was the day of our family barbecue - except the weather was crap, so the cooking was moved to inside the front of the garage, and everyone
else moved into the house. 10 adults, 2 chihuahuas and a couple of kids. Bliss.
Yesterday was the day of our family barbecue - except the weather was crap, so the cooking was moved to inside the front of the garage, and everyone
else moved into the house. 10 adults, 2 chihuahuas and a couple of kids. Bliss.
Oh, the reason for the flags? Well my wife's brother lives in the USA, and his wife is American. The other brother lives in Wales. Besides, it helps
to protect the cars from cooking smells.
Nevertheless, when I go to extract the TVR for the car club meeting today, it honks like a phone box that's just hosted a hog roast - albeit without
the underlying whiff of stale piss (older readers who have used red phone boxes will remember that distinctive perfume well).
I have to give the car a wee clean after I remove the cover, then it's off to Dave's to meet up with Eric. Two weather forecast say it should stay
dry. One forecast is for more rain. Lots of rain. We dial up the optimism and start roof-off (well Dave and I do, Eric has a Chimaera so the roof
is more of a permanent fixture.)
Off we go, me in the lead because Eric is trying to perfect the Tully trick of not knowing where anywhere is. Despite being locked to my boot for
most of the journey, he still manages to take a wrong turn at a roundabout. I stop with Dave to wait till he turns round, and the heavens open...
time for roof on! One correct weather forecast out of three ain't bad.
 We arrive at the venue last, even Hugh has beaten us.
We have the usual discussion of cars, food, etc. There's two "new boys" - one is thinking of buying a TVR, and Eric is thinking of selling one.
Serendipity or what? The other guy has a Chimarea and comes from Edinburgh.
Then it's time for home. the weather forecast said "dry". It pisses down the whole way. Great!
At least it washes away the BBQ stink!
I notice that the rev counter is moving between 2500 and 3000 revs at a constant speed, but drops to around 2200 when I switch the lights off. It
used to waver around like that before I had the chassis repairs in 2020, due to bad earths apparently. Maybe time to check them again!
:: Monday, 7 July 2025 ::
Tempted as I am to start today's journal with a stream of foul-mouthed invective, I shall refrain, since I am a gentleman of learning and culture,
and such language would be most unseemly. Suffice to say that I have had better days of positive motoring experiences...
It all started off so simple... "have a look at the TVR's earth connections" after yesterday's trip through the biblical monsoon. Let's start by
moving the TVR to the "working" side of the garage from against the far wall.
The Range Rover is parked at the garage door, where I left it to allow maximum driveway space for the BBQ visitors. It hasn't moveed since Friday.
It starts, but every warning light comes on, with a sequence of warning messages, so many that I can't even remember them all. The included
handbrake, electronic brake distribution, tyre pressure warning system, air suspension, etc etc all not working. I move the car forward on the drive
to allow room to manoevre the others...
Start the TVR, move it out.
Start the Vixen, move that out, and reverse it in to the other side, against the wall.
Then move the TVR back into the other side, to allow working space around it. I reverse it in, then roll it forward a few inches to straighten it
up behind the pillar between the doors. The car stops about a foot before I expected...
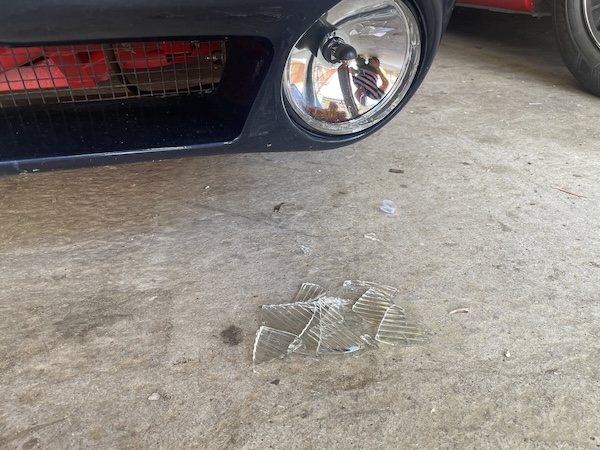
 Keeping up the resolution to avoid bad language, I find that that little forward movement has resulted in me rolling into a little plastic folding
stool that has broken the foglight glass... which is somewhat disappointing...
Keeping up the resolution to avoid bad language, I find that that little forward movement has resulted in me rolling into a little plastic folding
stool that has broken the foglight glass... which is somewhat disappointing...
But first, back to the Range Rover... I reverse it back to its normal parking position, again accompanied by various warning lights and wwarning
chimes. "Maybe these errors will clear iff I disconnect the battery" thinks I... 15 minutes later the warnings are all still thetre, but now the
car won't start at all...
Time for AA Homestart! They are out in 40 minutees, and plug in a wee tablet thing to the OBD port. It reports 22 error codes that leads to the
conclusion that he's not even going to try to fix it...
A phone call to the garage, and they can take it in tomorrow. Getting it to the garage is covered by the AA, so that transfer is booked for the
morning. Deep joy...
I might end up using the TVR for daily transport for a bit, so back to this broken light... Fortunately, I have a couple of brand new boxed matching
spares that I inherited from someone who had a garage clearout, so it should be a simple matter of swapping them over. "Simple" is relative though,
in the world of 35-year-old TVRs...
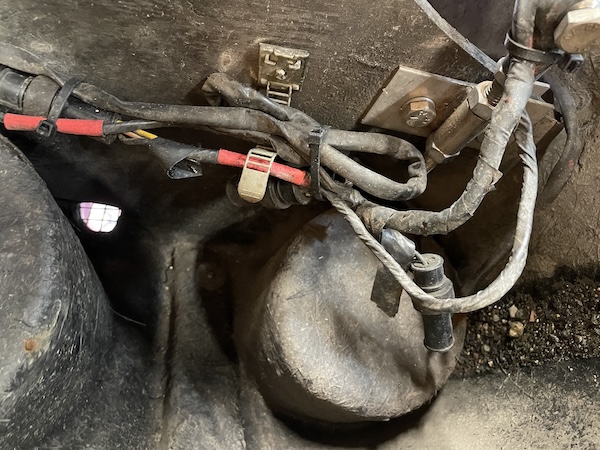
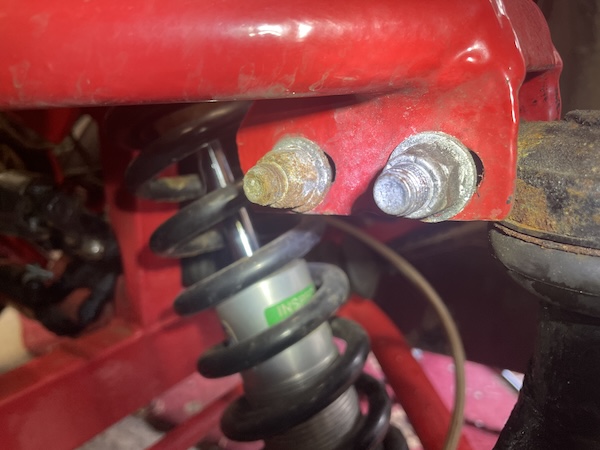
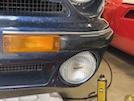
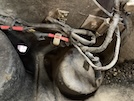 I lift the car so that I can get the bonnet vertical, then I remove the inner wheelarch so that I can access the wiring and the mounting bolt (which
is underneath that waterproof connector bottom-right in the photo).
I lift the car so that I can get the bonnet vertical, then I remove the inner wheelarch so that I can access the wiring and the mounting bolt (which
is underneath that waterproof connector bottom-right in the photo).
The bolt is a bugger though - it's held into the bracket on the back of the light by two wee tabs, but as soon as you get it loose by a half-turn,
the whole nut and bolt turns... I put a thick allen key across the back of the pod, and then use a pry bar under the washer to hold the bolt up
tight while I unscrew the nut, with plenty of release fluid. No photos of this operation because you need three hands plus one to hold the camera.
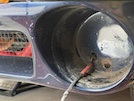
With the light removed, I take off the front and disconnect the wiring...
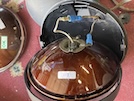 and connect the new one, with a new bulb.
 Then I clean out the inside of the pod...
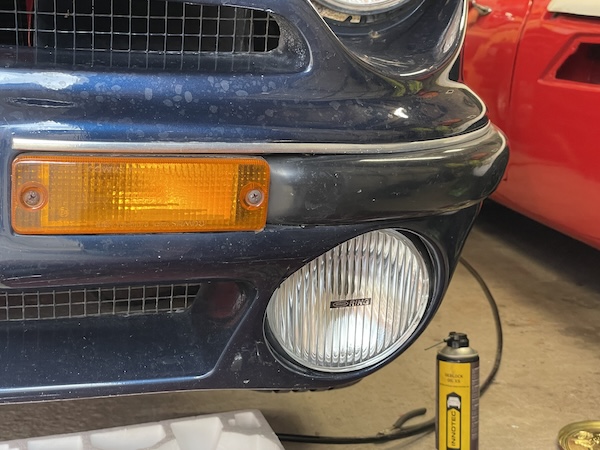
 and line up and fit the new light, making sure that I bend those wee tabs in to hold the bolt so that I can get the thing off again in the future!
:: Tuesday, 8 July 2025 ::
 The AA recovery man turns up at half past 8, and gets the car loaded and off to the garage. That's me carless until, well, who knows?
Not quite - I have a meeting this afternoon, so I'll take the TVR. It's still dirty from its rainy adventures on Sunday, but that's ok.
I only have to reconnect the wiring loom, tie-wrap the wiring in place, and refit the inner wheel arch. Job done!
Not the job I started doing, mind - looking for any earth connections that needed cleaned up. That will have to wait...
Update!!!
I got a call at lunch time from the garage - they say that the Range Rover is fixed already, and ready to go! It turns out that all those fault codes,
warning lights, refusing to start, etc all come down to one problem - poor earth! There is an earth point behind one of the front wheel arches that
earths a number of electronic control boxes including the ABS control unit. If that doesn't have the right voltage, then it makes sure that the car
won't start. The independent Land Rover garage I use, were straight on it (in fact he guessed last night, on the phone, that would be the problem).
So, all sorted (new earth points both sides), collected later in the afternoon when I got back from my meeting, happy days!
Meanwhile, the TVR ran like a dream today, although the rev counter still rises by about 300 rpm when I put the lights on (with no noticeable
difference in actual engine speeds). More earths to be checked!
:: Thursday, 10 July 2025 ::
A leisurely day playing in the garage, just checking stuff over.
First, these main earth points. There's one at the back of each wheel arch, on the diagonal tube leading down to each outrigger. On mine, the
offside one has a strap to the engine, with the other end bolted to the alternator bracket.
The nearside connector has 3 cables, 2 big ones and a little one.
The main battery earth is bolted to the chassis beside the coolant swirlpot (just behind the battery).
I take all of those off, and clean them up with contact cleaner and sandpaper, and then bolt them all back up.
There's also an earth strap between the back of the gearbox and the geearbox mounting - I cleaned all that when I replaced the gearbox, so that
doesn't need attention.
Next - general engine electrics. I take off the distributor cap and all the plug leads (they are marked so I know how they go back!) and then the
rotor arm. I check for any signs of arcing or tracking, then clean all of those up, and check the resistance through each of the plug leads.
Then I remove all the spark plugs and re-check the gaps and the general condition. Nos 4 and 5 seem a wee bit dirtier than the rest (maybe it's their
upbringing), but all of the gaps seem ok except one, which seems slightly too wide.
Then I remove the coil and take apart the big connector underneath it - it connects the engine loom to the rest of the car. I also remove the
connector to the fuel temp sensor (under the plenum), the throttle pot and the idle speed control valve, and clean all the contacts on both sides
of the connectors with contact cleaner.
Any excuse for a wee test drive - the car is going well, especially pulling away at low revs (I much prefer low-down dirty torque to a high-end
screamer) and seems really smooth at all revs. It still shows a drop of 300 rpm when you put the lights on though... Further investigation required,
when I can eventually be arsed.
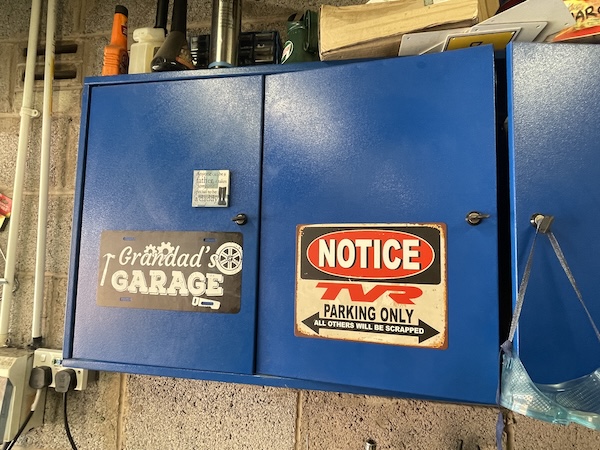
 When I get back, I put up two metal signs that I got from my 2 grandsons for my birthday. Much more important!
:: Saturday, 12 July 2025 ::
Do you know the TV show "Countdown"? Let's play it with swear words instead of letters. Think of 5 swear words from the top, and 4 from the bottom.
No, not mild words like "pee, po, belly, bum or knickers", we're talking (literally) really good effing and blinding here. Put your words together
in almost any combination, and then repeat in a different sequence. And again.
That's pretty close to my reaction yesterday afternoon... after a nice wee day out in the Range Rover, we stopped on the way home for a wee errand.
Get back in the car and the dashboard lights up with more warning alarms than a lie detector during a party political broadcast (by any party, in
whatever country you choose). These particular warning lights, though, seem to be focussed on the electric handbrake and the need to "recalibrate"
it by switching it on and off with your foot on the brake. I try that. Nothing.
I'm less than a mile from home, so I drive back, and by the time I park, the car is stinking of burny brakes, and one wheel is too hot to touch.
It's too late to take it to the garage so I call out the AA again, they remove the park brake motor so the car now runs ok - although it still has
various visual and pinging alarms when you move it. He advises not to drive it until I can get it into the garage.
This is a pity because we have to take a pile of folding chairs, a folding table, a gazebo and various party accoutrements about 30 miles today, for
a wee family party near Menstrie tomorrow. We manage to pack all of that into a 25-year-old VW Beetle, like a game of 3D Tetris, and stagger along
the M9 (where, coincidentally, I am bullied by a pompous impatient prick in a black Range Rover, who decides that daring to overtake at anything
less than 90mph is a serious impediment to his progress, so proceeds to to drive closer to my back bumper than I could park). Fortunately, I can't
see how furiously he is flashing his lights because he's so close that the lights are above the level of the back window.
Another three swear words from the top and two from the middle please.
Anyway, stuff all set up for tomorrow, and while we're doing that, I get a message from Dave, suggesting an impromptu run out tomorrow while the
weather is good. Unfortunately, I can't.
What I can do, though, is join in spirit, by taking the TVR to the party tomorrow.
:: Tuesday, 15 July 2025 ::
So we took the TVR to this party on Sunday, and had a great run through. It started to rain on the way back, so Mrs Git got a first-hand view of
the well-practiced "roof-on-in-a-hurry" technique. Like a Le Mans pit stop, it was...
The car still has this hesitation / misfire at around 2,500 rpm, once the engine is hot. You can drive around it (by easing off the accelerator
very slightly), so it sounds like a fuelling issue (especially since I have cleaned all electrical connections etc). Or it could be the throttle
position sensor?
So today, I take out a spark plug to see how the mixture looks (just about right...) and then remove the throttle sensor, which doesn't appear to be
screwed on very tight... then I test it by connecting a volt meter between the middle (signal) terminal and the right (voltage supply) terminal,
gradually turning the sensor with a screwdriver and watching that the resistance readings increase progressively without any bumps or gaps where the
contact track might be wearing through. I also test the earth from the TPS to the ECU. It all seems ok...
I clean it up and put it back. No test drive though because it's pishing down.
Also this morning, I take the Range Rover up to the garage to sort out this brake. One caliper, one brake disk, a hanbrake actuator motor and a full
set of brake pads later, and a spot of open-wallet surgery, it's sorted.
This makes me think - a throttle position sensor for the TVR is around £38... a (very small) fraction of the RR repair. If the fault is still there,
I'm going to order one and replace it anyway. If that doesn't sort it, I'll have to try to find a proper old-school engine tuning garage that doesn't
rely on OBD ports and computers.
:: Thursday, 17 July 2025 ::
 It's MOT time! Well, strictly speaking, it's not until 13 August, but I usually take it in early to either get 13 months, or time to fix it before
it runs out.
It's MOT time! Well, strictly speaking, it's not until 13 August, but I usually take it in early to either get 13 months, or time to fix it before
it runs out.
Unfortunately, it's a fail:
1. Lower steering column bearing rough. This one has lasted since October 2007; and
2. front offside wheel bearing noisy (not worn, just noisy).
The other front wheel bearing was replaced in May 2008, and again in May 2018 (mainly I think becaisse I was too lazy to replace the bearing faces
the first time). I'm sure I remember replacing this one, the offside one, at some point, but I can't find it in the diary entries or in previous
MOTs. Maybe I'm wrong, maybe it's still the original?
Anyway, I already have front bearings brand new, still in the box, complete with new bearing faces, oil seal and left- and right-threaded lock nuts
- I bought a set to do both sides last time, but only had to replace one. No need to buy anything to fix that!
The steering column bearing costs £16 including postage from a TVR specialist, or £6 including postage from a bearing stockist. Let me see...
Not exactly expensive repairs, but a fair bit of work required, specially on the wheel bearing! I don't have time to start it today though...
:: Friday, 18 July 2025 ::
I've had a look at previous MOTs. The car has failed 7 out of its last 21 MOTs. One of those, in 2007, was because the offside rear lights had a bad
earth and flickered when you put the indicator on while the rear light, brake light, fog light and reversing light were all on at the same time...
harsh but what can you do?
Once was because of play in the steering rack bush (again a bit fussy), and high exhaust emissions (the wire had broken on the fuel temperature sensor).
Once was because of play in a steering balljoint, and another because of a suspension balljoint.
Once was just after I got it back from the chassis repair in 2020, when the aim of both headlights was too high...
And two fails were because of front wheel bearings - both the same side (nearside) and the second one in 2018 was probably because I didn't fit new
bearing cups the first time, in 2008. So bearings only account for 2 fails out of 21 MOTs - far less than I thought, and hardly the major issue that
I thought it was!
Anyway, on to today and the offside wheel bearing, for the first time!
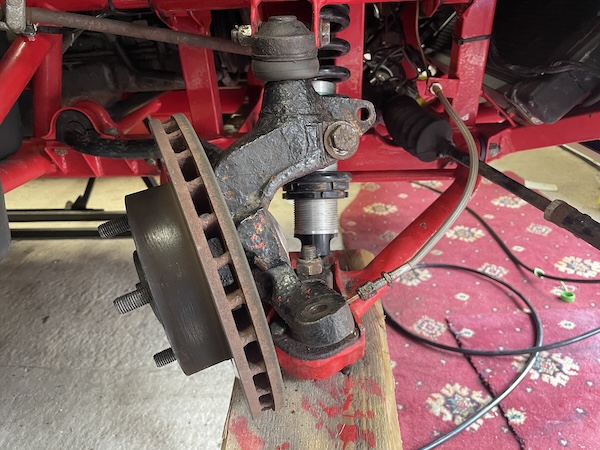
I start by lifting the car and removing the wheel, blah blah blah. Then I disconnect the brake pipe at the end of the flexipipe, and plug both open
ends to minimise brake fluid loss. Then I remove the big clamping bolt that goes through the back of the hub carrier, and hold the wee bracket for
the brake pipes. With that out of the way, I can remove the brake caliper, its bracket and all its hoses as a single unit.
Then I check the brake fluid reservoir and top it back up so that no air gets into the system when I'm refitting this later.
Next, the steering arm - I undo the bolt and use a ball joint separator to disconnect the arm.
Same procedure for the bottom balljoint - 22mm socket, loosen the nut, then the ball joint separator, careful not to damage the balljoint boot.
 Then I take out the two bolts holding the upper balljoint to the wishbone, after noting their exact position and noting which shims go behind and in
front of the joint.
Then I take out the two bolts holding the upper balljoint to the wishbone, after noting their exact position and noting which shims go behind and in
front of the joint.
 And that's it - front hub is off the car! That makes it sound so easy - in practice, this was a sweaty sweary session using a variety of different
tools of ever-increasing brutality.
And that's it - front hub is off the car! That makes it sound so easy - in practice, this was a sweaty sweary session using a variety of different
tools of ever-increasing brutality.
 Next step is to remove the grease cap - or what's left of it. It comes out in two jaggy rusted bits. I need to order another one!
The next step can be tricky - removing the nut from the end of the spindle. It's very very very very very tight. Ford say they should be 310 to
350nm, or 229 to 258 lb ft. I read on another forum that you "tighten them until the veins stand out in your temples, and then a bit more". Getting
them off requires no less effort.
 I clamp the axle in a vice - not tight, just enough to stop it turning. Then I fit a 41mm socket to the nut, with a breaker bar, a short box spanner.
and then another breaker bar reversed, to give a lotal length of about 3 feet. That means that the force needed at the end is about 1/3 of the torque
figure - 258 lbs at 1 foot equates to around 86 pounds at 3 feet. I weigh a teeny bit more than that, so swinging on the end of that contraption
undoes the nut in no time.
I clamp the axle in a vice - not tight, just enough to stop it turning. Then I fit a 41mm socket to the nut, with a breaker bar, a short box spanner.
and then another breaker bar reversed, to give a lotal length of about 3 feet. That means that the force needed at the end is about 1/3 of the torque
figure - 258 lbs at 1 foot equates to around 86 pounds at 3 feet. I weigh a teeny bit more than that, so swinging on the end of that contraption
undoes the nut in no time.
Remember though that the nearside nut has a left-hand thread - lefty-tighty, righty loosey. Forget that, and you'll be there a long time, or until
you die when one of those veins in your temples lets go.
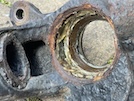
 Then I brace the whole hub assembly on two blocks of wood, and hammer the axle out of the carrier. I have put the inner bearing back on here, so
that you can see the state of it... the grease is well past its best, it looks like there has been water ingress, and the outer beearing is nearly
dry.
Then I brace the whole hub assembly on two blocks of wood, and hammer the axle out of the carrier. I have put the inner bearing back on here, so
that you can see the state of it... the grease is well past its best, it looks like there has been water ingress, and the outer beearing is nearly
dry.
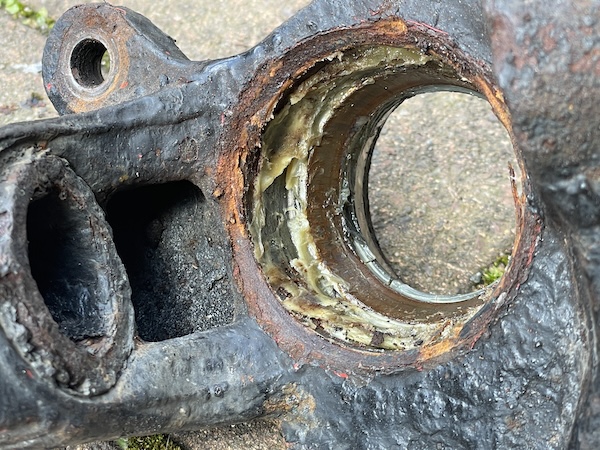
 Here's the hub looking through from the back. That doesn't look healthy at all...
 I drift out the inner and outer bearing cups. This photo shows the inner cup on the left, outer on the right. The outer one looks ok, but the inner
one is corroded.
I drift out the inner and outer bearing cups. This photo shows the inner cup on the left, outer on the right. The outer one looks ok, but the inner
one is corroded.
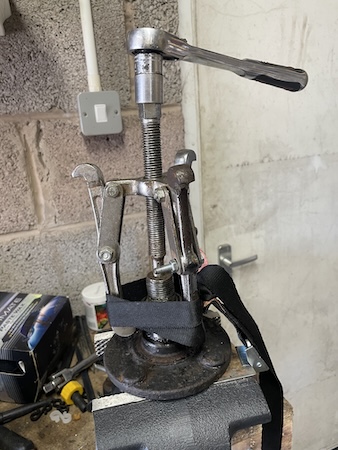
 The next job is to get the inner bearing off the axle, First I twist off the old oil seal, and cut away the rubber. That lets me get this puller
in behind the bearing, I use a ratchet strap with an allen key as a tourniquet to hold the puller legs in tight. The bearing pops straight off!
The next job is to get the inner bearing off the axle, First I twist off the old oil seal, and cut away the rubber. That lets me get this puller
in behind the bearing, I use a ratchet strap with an allen key as a tourniquet to hold the puller legs in tight. The bearing pops straight off!
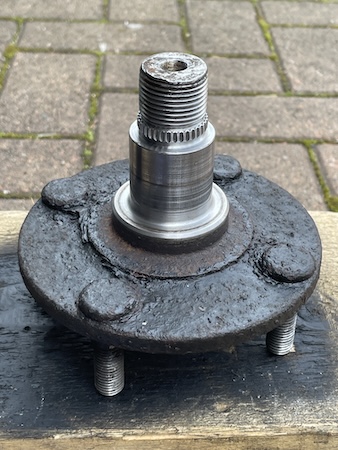
 Then I use a paraffin bath to clean all of the old grease off the hub carrier and the stub axle, ready to fit the new bearings.
It's dinner time though, so the next steps will be tomorrow!
Before I finish, though, I put a wee dab of red paint on the steering column balljoint to mark its alighnment for when I do the steering bearing.
:: Saturday, 19 July 2025 ::
 Lets start the reassembly of this front hub. First I fit the new bearing cups from each side, using the old cup as a spacer under the big 41mm socket.
 Then I can push on the new oil seal, and then the outer bearing, using a suitable size socket to drift it into place.
Then I mount the stub axle back in the vice, and grease the outer bearing and both bearing cups. Then I slip the hub carrier on, and drive the inner
bearing into place on the stub, with my drift / socket. Then I can fit the serrated washer and the new lock nut, and tighten it down with a ratchet.
 I don't have a torque wrench that reads to 229 to 258 lb-ft torque, so here's the alternative arrangement. A breaker bar, a box spanner as a "coupler"
and then two socket extensions results in a handle exactly 3 feet long. The middle of the specified range is 240 lb-ft, which as I said yesterday,
is the same as 80 lbs at 3 feet. That little spring scale there reads up to 80 lbs, so if I heave on that until the needle does one full turn,
that should be 240 lb-ft.
I don't have a torque wrench that reads to 229 to 258 lb-ft torque, so here's the alternative arrangement. A breaker bar, a box spanner as a "coupler"
and then two socket extensions results in a handle exactly 3 feet long. The middle of the specified range is 240 lb-ft, which as I said yesterday,
is the same as 80 lbs at 3 feet. That little spring scale there reads up to 80 lbs, so if I heave on that until the needle does one full turn,
that should be 240 lb-ft.
In the end, I pull it around 5lbs past "full circle" so that should be around 255 lb-ft, or closer to that than I could get by just guessing. Isn't
science wonderful? "O"-level physics right there... and no ruptured veins or coronary attacks.
It does feel feckin' tight though - I can hardly turn the hub by hand. I can remember that as being "normal" when I did the last one, and it frees
up after a few wiggles back and forth.
I can't do any more on that until I get the dust cover, which, according to Royal Mail tracker, is currently sitting in a mail centre in Birmingham,
so is unlikely to be delivered today.
So let's move on to the other issue, the steering column bearing. I remove the 13mm clamp bolt and disconnect the upper UJ.
 Then inside the car, I remove the upper and lower steering cowls, and then disconnect the wiring to the light switch, indicator switch, wiper switch,
and the ignition switch. Then I remove the two 17mm bolts holding the column under the dash, and that can be pulled out through the bulkhead.
Then inside the car, I remove the upper and lower steering cowls, and then disconnect the wiring to the light switch, indicator switch, wiper switch,
and the ignition switch. Then I remove the two 17mm bolts holding the column under the dash, and that can be pulled out through the bulkhead.
 That frees up access to remove the bearing housing.
 The bearing housing is held in with 5 wee allen screws, with nuts inside the engine compartment. You can't reach both ends at once, but with a
socket extension bar through the centre, you can brace allen keys against it, and take the nuts off from under the bonnet.
The bearing housing is held in with 5 wee allen screws, with nuts inside the engine compartment. You can't reach both ends at once, but with a
socket extension bar through the centre, you can brace allen keys against it, and take the nuts off from under the bonnet.
 Here's the housing off the car, with the bearing removed for inspection. It's manky, it's rusty, and it's as rough as hell when you turn it. Scrap.
Again, I can't do any more until I get the new bearing that I ordered on Thursday. I have an acknowledgement of the order, but nothing to say that
it has been posted...
So that's both jobs advanced as far as I can, while I wait for bits to arrive.
Putting bits together is usually easier than taking bits apart, so it shouldn't take long - but I can't book an MOT re-test until I have those parts
in my hands.
:: Tuesday, 22 July 2025 ::
Still waiting for the wheel bearing grease cap, but the steering column bearing arrived yesterday, so we can at least get that part of the job done.
Not a lot worth writing about - push the bearing into the holder, and then push the triangular plastic bush through the middle.
Then I fit the whole assembly through from inside the footwell, with a wee smeaar of sealer to prevent water coming in. I repeat the wee trick with
the allen key pressed agains a socket extension, while I tighten up the nuts from the outside. Then fit the whole steering column through, and
loosely fit the two 17mm bolts and spacers that hold the upper end in place. Then I reconnect the wring to all of the column switches, and to the
boot release and fan over-ride switch. I reconnect the battery temporarily and check that everything works.
Then I fit the upper and lower steering column cowls, so that I can get the column in exatly the right place before tightening the two big mounting bolts.
The last step is to fit the top UJ to the other end of the column, in the position I marked before, and tighten up the clamp bolt.
Now I have to wait until I get this grease cap, before I book a re-test... I still haven't heard if it has even been posted.
:: Wednesday, 23 July 2025 ::
 Postman Pat delivers the part I've been waiting for - the wee grease cap that goes over the stub axle. It's not quite the same as the old one, but
it fits, so I knock it into place.
Postman Pat delivers the part I've been waiting for - the wee grease cap that goes over the stub axle. It's not quite the same as the old one, but
it fits, so I knock it into place.
Then I can put that assemble in place on to the lower balljoint, and line up the top balljoint. Getting the bolts in, with the alignment shims in
the right place, needs a bit of perseverence, but eventually I get them into place, get the nuts on, and align the bolts to where they were before
(this controls the camber adjustment). Then I can tighten those up. I even use a torque wrench!
 Then I put on the bottom balljoint nut. It won't tighten though - the whole ball is turning in the joint. I put a jack under it, but it's still
turning. so I wrap a ratchet strap around the lower and upper wishbones and tighten them together, combined with the jack underneath. That lets me
tighten it!
Then I put on the bottom balljoint nut. It won't tighten though - the whole ball is turning in the joint. I put a jack under it, but it's still
turning. so I wrap a ratchet strap around the lower and upper wishbones and tighten them together, combined with the jack underneath. That lets me
tighten it!
 With that in place, I can replace the brake disk and then the brake caliper, tightening it into the hub carrier.
The next step is to connect up the brake hose - the flexi from the chassis mounts into the hub carrier in that hole in the back there, then there's
a circle of metal pipe connected to that - then another flexi to the caliper. I connect up the hose, and then fix the bracket to the pinch bolt you
can see through the rear of the hub here, held by the bolt and washer.
Last step is to fit the track rod end to the steering arm. Then I can bleed this brake using the vacuum bleeder.
A wee test drive, all seems to be ok! I book an MOT retest for Friday morning.
I'm absolutely knackered though. Working on cars is nowhere near as easy as it used to be - even getting down on the floor and getting up again
requires careful advance planning, and having my phone within reach, just in case... I'm glad I bought those quicklifts - they do make jobs like
this a lot easier. I do still enjoy these kinds of jobs - I'll pay for it tomorrow though, when I can hardly move!
:: Friday, 25 July 2025 ::
Had a wee drive out yesterday just because... Everything seems to be good! I've mounted the steering wheel very slightly higher than before - I have
usually mounted the column and then added the cowls, and it's alwayss been slightly squint. This time, I fitted the bolts, then the cowls, and then
lifted the column into position, with the cowl straight, and it looks a lot better. it also makes the driving position slightly more comfy, so what's
not to like?
So it's back to the MOT garage first thing this morning - quick check of two bearings and it's a pass!
The next challenge will be the VW Beetle - it had a list of advisories last time that I looked at, but didn't do anything about...
The Range Rover MOT and service is also due in September. I'll also be paying for the Vixen paint. It's going to be an expensive month!
 Yesterday was the day of our family barbecue - except the weather was crap, so the cooking was moved to inside the front of the garage, and everyone
else moved into the house. 10 adults, 2 chihuahuas and a couple of kids. Bliss.
Yesterday was the day of our family barbecue - except the weather was crap, so the cooking was moved to inside the front of the garage, and everyone
else moved into the house. 10 adults, 2 chihuahuas and a couple of kids. Bliss.
 We arrive at the venue last, even Hugh has beaten us.