:: Diary - December 2025 ::
:: Tuesday, 2 December 2025 ::
Not TVR related, but I need to vent…
On Sunday I had to drop Mrs Git off at a ladies’ charity lunch at a rather nice hotel, and return to pick her up later. No TVRs were involved
because the concepts of “Mrs Git in full glam mode” and “TVR” are unlikely ever to meet.
Now this hotel, posh as it is, has a long narrow drive, with 4 fairly generous passing places along its length. They aren’t that far apart, the
drive is flat so you can see the whole length from any point - no surprises at bends etc. Or so you would think…
We arrived early so all was ok. I’m not going to write out the whole sequence of muppetry and fuckwittery that evolved over the next 10 minutes, as
I was trying to leave again. Suffice to say that the whole drive and car park reached total gridlock, just because people don’t understand the
concept of “how to use a passing place”, or “how to drop off glammed-up passengers without bringing the whole place to a standstill”.
We’ve seen this before on our TVR tours, but it’s interesting to watch the situation evolve when you’re not in the middle of it.
Me? I remember that the hotel has a very “agricultural” service access on to a farm track to the rear, and I’m in a Range Rover, so I decide to
turn around and go out that way.
:: Thursday, 4 December 2025 ::
There seems to be a new sickness epidemic going around our way. It’s apparently called “Upgradicitis25”, which is defined as an unreasonable
impulse to improve old cars that are already ok, and to fix things that aren’t broken.
I am currently undertaking self-tests, which have identified that the initial symptoms are present, including:
1. Looking at classic car adverts even though I think I have no intention of buying one;
2. Planning on tuning the Vixen’s existing carburettor, to improve initial pick-up - this involves re-jetting and on-road testing;
3. Planning an electric fuel pump to replace the existing mechanical one (it takes ages to pump fuel when the car hasn’t run for a while, by which
time the battery’s too knackered to start the bloody thing);
4. Exploring the “fuck-it” option of installing twin webers (which would definitely need the electric fuel pump upgrade first);
5. Considering removing the differential and getting it rebuilt, just to remove a bit of backlash when it first takes up drive; and
6. Recently retired and looking for unproductive ways to waste time.
Now, on a scale of 1 to 10, where 1 = “leave it alone and try to ignore it” and 10 = “needs to be fixed before it kills you”, none of these rate
higher than a 2 “momentarily gets on your tits but soon passes”. But that’s not the point, is it?
There is no known cure apart from open-wallet surgery… All that I can do is self-isolate from classic car websites and Burton Power catalogues, but
I fear that might not be enough to save me. Woe is me.
:: Friday, 5 December 2025 ::
Another day of "nothing to report". I did drop in to a transmission specialist, to try to get some estimate for rebuilding the Vixen's diff, but he
said (quite reasonably) that he couldn't give any estimate until he saw it, and then found out if he could get the right parts if required (not
"cheap foreign shite" as he put it).
Decision: leave it alone until we sort out any engine hesitations etc that might make the diff backlash seem worse than it is.
When I get home, I repeat the soapy water test on the back window, now that the sealer will be properly dry - no signs of any bubbles so hopefully
that means no more water leaks!
:: Saturday, 13 December 2025 ::
A whole week without updates? Is he dead? Well no, but it has been a busy week for one reason or another - but not on TVRs.
We had the local club meeting on Sunday, and we all went through in Eric's car. Thde meeting itself was the usual "no events to announce, no
upcoming activities" thing (unless you're already one of the pre-booked select few who are going to the Celtic Gathering, which is only around 3
miles from here).
We had a very nice Christmas lunch though, and good chat, so it was all worthwhile! We did start our own pre-planning for the TVRCC season opener in
May, although our TVRCC region don't appear to formally take part.
On Tuesday, I started thinking seriously about this upgrade to an electric fuel pump, so I ordered various bits from 3 different places.
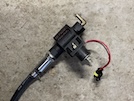
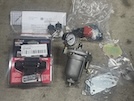 The last parcel was delivered yesterday, and here they all are! There's a wee fuel pump (up to 5 psi), with mounting bobbins to minimise vibration,
an inertia "kill switch" that cuts off power in an accident, a fuel filter / pressure regulator with gauge, and a blanking plate to fill the hole
where the old mechanical fuel pump goes.
The last parcel was delivered yesterday, and here they all are! There's a wee fuel pump (up to 5 psi), with mounting bobbins to minimise vibration,
an inertia "kill switch" that cuts off power in an accident, a fuel filter / pressure regulator with gauge, and a blanking plate to fill the hole
where the old mechanical fuel pump goes.
I've got plenty of electrical cable in various colours, and plenty fuel hose left over from when I replaced all the hoses on the S. I also have a
brand new rocker switch that I can use to switch the pump separately from the ignition switch.
The pump will go under the boot floor beside the petrol tank, with a filter in the hose from the tank. The intertia switch will go on the bulkhead
near the fusebox.
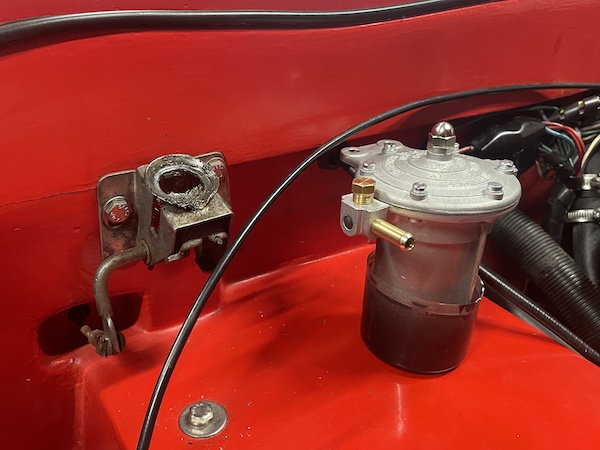
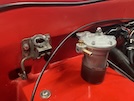
 The most difficult bit will be mounting that pressure regulator and filter. It's much bigger than I expected, and might be a tight fit between the
strengthening rib along the rear edge of the bonnet, and the top of the peddal box. I think it should be ok here, but I'm going to make up a wee
frame to hold it in place while I try shutting the bonnet.
The most difficult bit will be mounting that pressure regulator and filter. It's much bigger than I expected, and might be a tight fit between the
strengthening rib along the rear edge of the bonnet, and the top of the peddal box. I think it should be ok here, but I'm going to make up a wee
frame to hold it in place while I try shutting the bonnet.
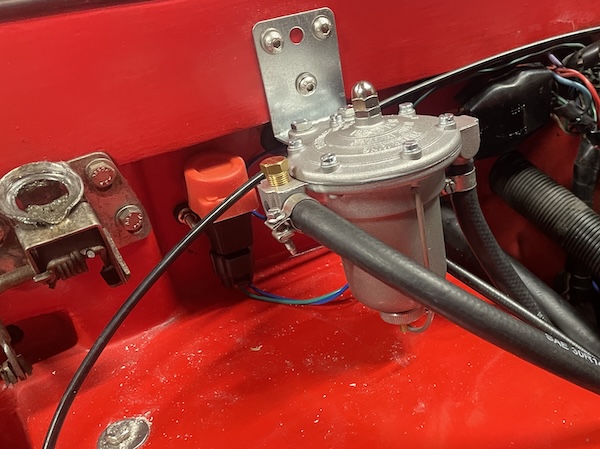
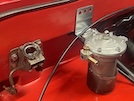
 The alternative would be to mount it to the left of the bonnet catch here, where the bulkhead is deeper beside the pedal box. The downside is that I
would need to extend the fuel hose fron the tank, and also the hose from the pump to the carburettor, which might result in a loss of fuel pressure...
It would also be difficult to attach the fuel pressure gauge under the lip of the bonnet, for setting it up.
The alternative would be to mount it to the left of the bonnet catch here, where the bulkhead is deeper beside the pedal box. The downside is that I
would need to extend the fuel hose fron the tank, and also the hose from the pump to the carburettor, which might result in a loss of fuel pressure...
It would also be difficult to attach the fuel pressure gauge under the lip of the bonnet, for setting it up.
There is another location, down the front of the pedal box under the clutch, and behind the wheelarch. That would connect easily to the existing
fuel hoses, but isn't very accessible for adjusting fuel pressure etc.
More checking of dimensions required!
:: Sunday, 14 December 2025 ::
I had a short opportunity today, between various other things, to re-check the dimensions for fitting this fuel filter / regulator. Withe everything
measured up, it looks like it should fit in my preferred location (on top of the pedal box), but you know the old saying - measure twice, cut once,
which is when you discover that you fucked up both measurements...
Let's put the theory to the test - let's support the filter in place, while we shut the bonnet to check clearances. But how to hold it in place?
 Aerosols! The bottom of the filter fits perfectly into a paint aerosol cap. I place it where the measurements suggest it should fit, then shut the
bonnet. It's perfect. I check behind there, up behind the dash, to ensure that I can reach any bolts drilled through that bit of the bulkhead.
Aerosols! The bottom of the filter fits perfectly into a paint aerosol cap. I place it where the measurements suggest it should fit, then shut the
bonnet. It's perfect. I check behind there, up behind the dash, to ensure that I can reach any bolts drilled through that bit of the bulkhead.
The supplied bracket is a straight piece of metal, so I need to put a bend in it so that I can mount it to that bulkhead. Measure where the bend
has to be (not too far back, because then the bonnet hits the adjusting bolt on the filter housing) and not to far forward (to reduce the springiness
and vibration through the bracket, as much as possible). Then I draw the bend line, clamp it in a vice, and hammer it over gradually to the right
angle.
 I place it against the bulkhead again and check yet again that the bonnet shuts. Still perfect!
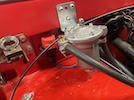
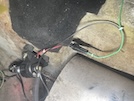
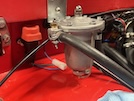
 And here it is from underneath the side, with the bonnet almost closed. You can see the bracing bar across the back of the bonnet, well clear of
the big central pressure adjuster nut. The brass plug closer to us is removable, to allow me to screw in a fuel pressure gauge to set the system
up. The instructions say that you're not supposed to leave the gauge in all the time (although I have seen many who do).
And here it is from underneath the side, with the bonnet almost closed. You can see the bracing bar across the back of the bonnet, well clear of
the big central pressure adjuster nut. The brass plug closer to us is removable, to allow me to screw in a fuel pressure gauge to set the system
up. The instructions say that you're not supposed to leave the gauge in all the time (although I have seen many who do).
I try the tank and carb hoses on the inlet and outlet, to make sure that they will fit and can be routed around anything else
So, now that I know that this will fit, the next step will be to fit the pump beside the tank, under the boot floor, cut the feed hose to fit it
in, and wire it up.
Then I need to properly install the regulator and inertia switch, re-route the fuel hoses from the tank and to the carb, and remove the mechanical
pump. Not today though - other family stuff beckons!
:: Monday, 15 December 2025 ::
I am starting to wonder how I ever found the time to go to work! We've been running around sorting other folks' stuff, including lending out Mrs
Git's VW to temporarily replace a 1.0 Ecoboost Fiesta with a knackered timing belt. Ford, in a drug-induced haze of engineering foresight, made
the timing belt run through the sump - a "wet belt". This leads to them becoming... erm... fucked.
Anyway, another hour at the car today. First job was to drill the bracket for that regulator / filter to make a third hole further down. This should
brace it better against the bulkhead and minimise any vibration. Then I marked up the position for the mounting holes for that and the inertia switch.
Couldn't be arsed getting the drill out again so I'll leave that for now, until I'm also ready to install the pump mounts.
 First, I fit the hose connectors into the pump - the wee brass one to the outlet, and the chrome inline filter to the inlet, with a bit of ptfe
tape to seal the threads.
First, I fit the hose connectors into the pump - the wee brass one to the outlet, and the chrome inline filter to the inlet, with a bit of ptfe
tape to seal the threads.
Then I connect the pump briefly to the battery, to see how noisy it is. It's not exactly quiet, but no louder than the pump in the S - I'm mounting
it on rubber "spools" but you'll still hear if it's working or not, but you're not going to hear it after the engine fires up!
Next, the pump mounts. The instructions say that the pump should optimally be mounted at a 45 degree angle (outlet up) to prevent vapour lock, near
the fuel tank and not more than 12 inches above the minimum fuel level. I see online that many people have installed this pump in the engine bay,
which is a lot easier! And they say it works fine. I'm going to follow the instructions though, and make life hard for myself. Why change the habit
of a lifetime, eh?
So it's time to scramble behind the seats and lift the boot carpet, remove the side trims, and unscrew the boot floor over the tank.
 Here's the top of the fuel tank... the yellow arrow shows the level of the top of the tank, about 2 inches below the boot floor. The tank is 11
inches deep, so as long as the pump is below the top of the tank, it should work fine, because it can draw fuel up 12 inches...
Here's the top of the fuel tank... the yellow arrow shows the level of the top of the tank, about 2 inches below the boot floor. The tank is 11
inches deep, so as long as the pump is below the top of the tank, it should work fine, because it can draw fuel up 12 inches...
That space in front of the end of the tank tooks ideal - it's big enough, and allows the hose to be split and routed through the pump. However, the
red dashed circle shows the approximate position of the end of the main chassis tube, on the other side of that panel (under the end of the black
rollover bar). There's also a chassis strut that goes diagonally from there, to the corner of the wheelarch (approximately in the red box) so I
don't want to be drilling into that!
Here's that old saying again - measure twice, cut once. I need to lift the car and remove that wheel, so that I can check measurements from the
other side.
Unfortunately, once again, I can't be arsed today...
:: Wednesday, 17 December 2025 ::
Got distracted by a youtube video this morning - it showed a Citroen rally car getting a 30-minute service stop. It arrived for this service with
one rear wheel dragging sideways behind it, no rear bumper, and most of the bodywork in that rear corner battered to buggery. It was on jacks
before the driver opened the door to get out, then the team descended like an army of wee orange ants.
Off came the broken suspension strut, complete with spring, hub and brakes, followed in pretty short order by the exhaust, suspension wishbones,
rear subframe, driveshafts and differential. The reassembly of new parts started before all of the old parts were off, with delicate bodywork
adjustments by the wielding of the biggest hammer the guy could lift.
New brakes fitted and bled, new lights taped in place., new rear bumper fitted, bootlid fixed closed by a bungee strap, driver in, engine starts,
car lowered to ground, door shut and it's off - 29 and a half minutes to rebuild most of its arse end.
It takes me longer than that to find the 10mm socket I put down 4 seconds ago...
Anyhoo... got the car lifted today, and the nearside rear wheel off, to look at how to fit the pump in the boot.
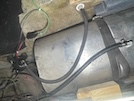
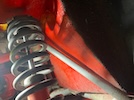 Here's the front of the boot floor. You can see that diagonal strut that I mentioned the other day - right where the pump mounting bolts would need
to be. I use a bit of wood, the same thickness as the mounting bobbins, to try to place the pump between the tank and the boot wall to work out hose
angles etc - but it's as tight as an Aberdonian's wallet on charity flag day.
Here's the front of the boot floor. You can see that diagonal strut that I mentioned the other day - right where the pump mounting bolts would need
to be. I use a bit of wood, the same thickness as the mounting bobbins, to try to place the pump between the tank and the boot wall to work out hose
angles etc - but it's as tight as an Aberdonian's wallet on charity flag day.
It might fit, just, but it's more likely to either vibrate against the tank, or introduce a kink in the hose in from the tank.There's a better space
on the back of the wheelarch - slightly longer hose from the tank, but I can get the pump lower so it should self-prime. I mark out a suitable
location and drill for the pump mounting.
Before I fit it, though, I've ordered a right-angled output connection, to keep the hose forward to the engine as straight as possible under the
boot floor. So let's move to the engine bay end.
I mark and drill holes in the bulkhead for the pressure regulator and the inertia switch.
 Then I fit those to the bulkhead, and fit the inlet and outlet hoses with nice shiny proper hose clips. The inlet hose to the old mechanical pump
is too short to reach the new regulator, so I fit a non-return valve in the end, and a bit of new hose from there up to the inlet. I also fit a new
hose from the regulator to the car, replacing the old one which is too short and pretty degraded.
Then I fit those to the bulkhead, and fit the inlet and outlet hoses with nice shiny proper hose clips. The inlet hose to the old mechanical pump
is too short to reach the new regulator, so I fit a non-return valve in the end, and a bit of new hose from there up to the inlet. I also fit a new
hose from the regulator to the car, replacing the old one which is too short and pretty degraded.
That rally team could have built a whole bleeding car in this time. They're not tripping over christmas lights, cardboard boxes for christmas lights,
cables, tools and various other kinds of shite though, are they?
Then it's time for an airport collection, a bit of shopping, and some farting about with other stuff.
Only the pump to fit, plumb it in, then complete the wiring, and we should be ready for ignition sequence start!
:: Saturday, 20 December 2025 ::
It's beginning to look a lot like Christmas, everywhere you go. And there seems to be an endless list of places to go... This isn't helped by us
ordering new sofas for the git-house, which were delivered on Thursday, and then trailing for miles yesterday to pick up something else. Mrs Git's
car is still on loan to Daughter No 1, so chauffeur duties have prevailed.
In between all that, I've been wasting time watching more youtube videos, including another rally service video, where they carried out a gearbox
change within their allotted 30-minute service time. It all looks very slick, until the guy underneath (who seems to be doing most of the work)
start rummaging around on the floor for something. Soon, there's 3 of them moving tools and shaking rags, peering under wheelstands etc for this
missing part.
Then one of the "extras" accidentally pulls a driveshaft CV joint apart while tryoing to re-install the front strut, so has to run off to the van
for a replacement.
Suddenly, I don't feel so bad!
One thing I notice is that the guy underneath hardly moves - he's got a few wee santa helpers fetching and handing parts and tools. I seem to spend
half my time extracting myself to go and get something that I've just realised that I need.
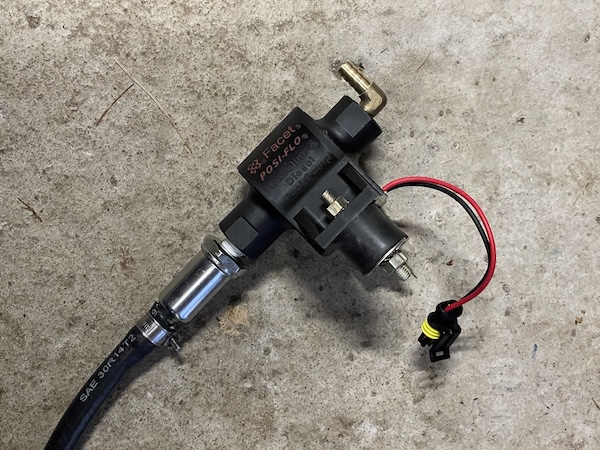
Anyway - back to the Vixen today. First task is to install a two-pin waterproof connector to the pump wires. It doesn't need to be waterproof,
because it's going under the boot floor, but at the rate that water was pishing around that back window, best to be cautious, eh?
 Then I install a length of hose to the inlet end, enough to reach the tank outlet (and a bit to spare) and then install the right-angle outlet
connector to make fitting the outlet hose easier, once it's in the car. I also install the rubber bobbin mounts to the pump, so that's it ready
to install!
Then I install a length of hose to the inlet end, enough to reach the tank outlet (and a bit to spare) and then install the right-angle outlet
connector to make fitting the outlet hose easier, once it's in the car. I also install the rubber bobbin mounts to the pump, so that's it ready
to install!
Before I stuff myself into the back of the car, I remember the video, so I assemble everything I think I'm going to need - hose cutters, hose clips,
supply and earth cables, an earth connector, wire cutters, crimping pliers, a couple of screwdrivers, a bit of wood to hold the pump in place, and
the pump itself. Efficiency, see?
 Then I scramble into the back of the car and fit the pump in place, with the help of a mirror to find the drilled holes, and brace it in position
with the wood. Back out, and fit the mounting nuts under the wheelarch, with big penny washers.
Then I scramble into the back of the car and fit the pump in place, with the help of a mirror to find the drilled holes, and brace it in position
with the wood. Back out, and fit the mounting nuts under the wheelarch, with big penny washers.
 Then it's back into the car, and cut the hose coming out of the tank, which goes forward to the engine, and fit that to the pump outlet, then fit
the new inlet hose to the tank connector.
Then it's back into the car, and cut the hose coming out of the tank, which goes forward to the engine, and fit that to the pump outlet, then fit
the new inlet hose to the tank connector.
Now all I need to do is wire it into the car. First, a wee test. I plug in the wiring connector, and then connect up to a suitable earth, and then
check that all the new hose joints in the engine bay are tight. Then I connect up the fuel pressure gauge to the regulator, before I hold the
green "feed" wire to a supply. The pump bursts into life!
So - only the permanent wiring to complete! I remove the centre console and run the green wire under it, to the back of the dash, where I fit a
connector to an in-line switch. Then working towards the supply end, I fit another green wire from the switch to an in-line 5A fuse, and then through
the existing wiring grommet in the bulkhead, to just above the car's fuse box, where I fit another connector to the intertia switch wiring.
Then I connect up the inertia switch to the "ignition out" terminal on the car's fusebox. All done! I hope!
Open garage door. Extinguisher at the ready. Ignition sequence start!
Right, disconnect the battery charger, reconnect the battery to the car, get in and ignition on. Moment of truth - switch fuel pump on - and mothing.
Bugger bugger and thrice bugger... After testing continuity at various connections, I figure out that the feed isn't getting through the interia
switch. I check that it's reset, but there's no connection. Ok, we'll bypass that for now, for testing purposes...
Delayed launch system starts - and the pump buzzes into life and the car starts!
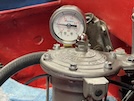 I check the running fuel pressure again, and let it warm up a wee bit until it idles without choke, while I check all the fuel hose joints for any
signs of leaks. Then I can adjust the running fuel pressure to around 3 psi - too low and the car can't get enough fuel at higher revs, too high
and the engine will flood if the needle valve is forced open.
I check the running fuel pressure again, and let it warm up a wee bit until it idles without choke, while I check all the fuel hose joints for any
signs of leaks. Then I can adjust the running fuel pressure to around 3 psi - too low and the car can't get enough fuel at higher revs, too high
and the engine will flood if the needle valve is forced open.
Then I stop the engine and remove the fuel pressure gauge and put in the wee brass bung.
By the time I've done all this, I've been in and out of the back of the car about 20 times, and in addition to the box carrying all the tools I would
need, there's two more scredrivers, a mirror on a stick, a tin of WD40, 2 different spanners, cable ties, pliers, and a torch. So much for full
efficient preparation...
Now all I need to do is replace the boot floor and carpets, re-install the centre console and put that back wheel back on.
Oh and one last thing - I need to remember to take the mechanical fuel pump off the engine block.
:: Sunday, 21 December 2025 ::
 The inertia switch came without any instructions, except that it should be mounted vertically. It has a 3-pin connector but only two wires though,
so it's obvious that one goes to "feed" and the other goes to "pump". Or so you would think eh?
The inertia switch came without any instructions, except that it should be mounted vertically. It has a 3-pin connector but only two wires though,
so it's obvious that one goes to "feed" and the other goes to "pump". Or so you would think eh?
Naw... I did a bit of research last night, and the 3 terminals are "supply", "normally open" (but closing in an impact to switch on any warning light
that the switch has been activated), and "normally closed" (opening in an impact to cut off the fuel supply). I discovered last night that, out of
the box, the switch has wires to the "normally open" terminal. I need to re-wire the switch connector so that it's "normally closed". That's not
too hard, but it would have been nice to have a wee warning on the box.
So the first task today is to pull off the switch connector, and remove the middle wire and terminal (normally open) and move it to the end
(normally closed). Wire it back into the pump circuit in the car and it now works as it should.
Next - the old mechanical pump. I unbolt it from the engine block and bolt the blanking plate in its place.
Then I re-install the boot floor and carpet, then the centre console.
Finished! Well, except for putting the mountain of tools and drills etc away...
Then it will be time for a road test, when the weather is better and the road is dry. Which might be March. Sod it - the roads are damp, but the
force is great, and 10 minutes won't do any harm! It's getting dark though, but at least I can confirm that the lights all work! In fact,
everything seems to work, the car seems to be running well, until I come to the first junction - no indicators to the left or right! I must have
dislodged a wire somewhere in all that rummaging around behind the dash, either when doing the dash in November, or this week wiring up the fuel
pump... I'm not going to look for that tonight though.
:: Monday, 22 December 2025 ::
I start by wading through the piles of tools and other crap lying all over the workbench and the floor.
Then it's on to the Vixen's indicators. Both directions aren't working, so the most likely place to look is the flasher unit, under the steering
column. I pull off the connector to check for supply etc, and notice that the terminals are really dirty. I give them a bit of a clean, and the
indicators work!
Next, the new fuel pump switch os loose in the dash, so I fix the wee panel into the dash with a couple of wee screws.
Last, it has the remains of an aerial in the back wing, but it's loose and probably letting in water. I clamp a mole grip inside and tighten the
nut outside.
Now, the next job is back to the faithful old S. I moved it last week to get something out from behind it, and noticed that the bottom door hinge
has come loose. So my last job for today is to strip the inside off the driver door (full procedure is set out elsewhere on this site) and hold
the back of the door up while I re-tighten the hinge bolts. That's much better!
I put the door back together, and then notice that I have left the car switched on when I moved it, so the battery is down to 9.9 volts... I stick
a trickle charger on it, and hope that the battery hasn't been killed.
:: Saturday, 27 December 2025 ::
Well, it's now two days since the big fat guy climbed down the chimney and left all the prezzies. Due to an apparent mix-up between elves, I have 3
Alp-sized bars of Toblerone, and no Alpine 110. The requested Ferrari has been swapped for Ferrero Rocher. I must get that fat beardy bastard some
hearing aids.
Anyway, I've waited 2 days for the post-Christmas belly to deflate a bit. Since I've been doing the same for 21 consecutive Christmasses, I'm not
expecting much success, but I waddle out to the garage anyway.
First good news is that the battery in the S has taken a good charge and sits at just over 13 volts.
Back to the Vixen, where I noticed a bulb hanging down the back of the dash. I put the garage lights off and the car lights on, and that shows that
there's no light in the tach. A bit of groping about gets that bulb back in, but now the oil pressure and ammeter dials are dark. I put my hand up
to investigate and they flicker back into life. The wiring behind the dash is like a rat's nest, I should have tidied that when I had it apart.
Next, I decide to start the car. It takes a couple of tries, but bursts into life. It seems to take ages to warm up though, and almost dies when
I try to pick the revs up on the throttle. It's better when it's warm , but I decide to check the fuel pressure, just in case. Blanking plug
out, gauge in, and it seems fine...
It needs a wee road test, and maybe some re-jetting, but that's a job for better weather.
:: Tuefridensday, 42 December 2025 ::
Since I retired in October, I've got up every morning wondering what day it is. That's been even worse over this period between Christmas and New
Year - the days that time forgot. God knows what day it is, or who I am, or why.
Nothing much to report on the TVR front - the S needs a good clean, but not while the weather's freezing.
I've tinkered about with a few wee things on the Vixen, mainly wiring to the map light behind the centre console, and also noticed that one of the
bonnet hinge bolts is loose so the pivot has moved slightly. That encourages (or forces) me to examine the bonnet adjustment and reset the hinge
pin position.
The weather is still cold, and the roads are getting salted every night, so I'm not taking the car out to test the carb adjustment and see what
effect different carburettor jets might make. That will have to wait.
It's nearly time to start thinking about events for our wee group to attend this year. The first official TVR Car Club event isn't until May next
year, so maybe we'll try to fit in a wee shakedown run before then.
 The last parcel was delivered yesterday, and here they all are! There's a wee fuel pump (up to 5 psi), with mounting bobbins to minimise vibration,
an inertia "kill switch" that cuts off power in an accident, a fuel filter / pressure regulator with gauge, and a blanking plate to fill the hole
where the old mechanical fuel pump goes.
The last parcel was delivered yesterday, and here they all are! There's a wee fuel pump (up to 5 psi), with mounting bobbins to minimise vibration,
an inertia "kill switch" that cuts off power in an accident, a fuel filter / pressure regulator with gauge, and a blanking plate to fill the hole
where the old mechanical fuel pump goes.
 The most difficult bit will be mounting that pressure regulator and filter. It's much bigger than I expected, and might be a tight fit between the
strengthening rib along the rear edge of the bonnet, and the top of the peddal box. I think it should be ok here, but I'm going to make up a wee
frame to hold it in place while I try shutting the bonnet.
The most difficult bit will be mounting that pressure regulator and filter. It's much bigger than I expected, and might be a tight fit between the
strengthening rib along the rear edge of the bonnet, and the top of the peddal box. I think it should be ok here, but I'm going to make up a wee
frame to hold it in place while I try shutting the bonnet.
 The alternative would be to mount it to the left of the bonnet catch here, where the bulkhead is deeper beside the pedal box. The downside is that I
would need to extend the fuel hose fron the tank, and also the hose from the pump to the carburettor, which might result in a loss of fuel pressure...
It would also be difficult to attach the fuel pressure gauge under the lip of the bonnet, for setting it up.
The alternative would be to mount it to the left of the bonnet catch here, where the bulkhead is deeper beside the pedal box. The downside is that I
would need to extend the fuel hose fron the tank, and also the hose from the pump to the carburettor, which might result in a loss of fuel pressure...
It would also be difficult to attach the fuel pressure gauge under the lip of the bonnet, for setting it up.